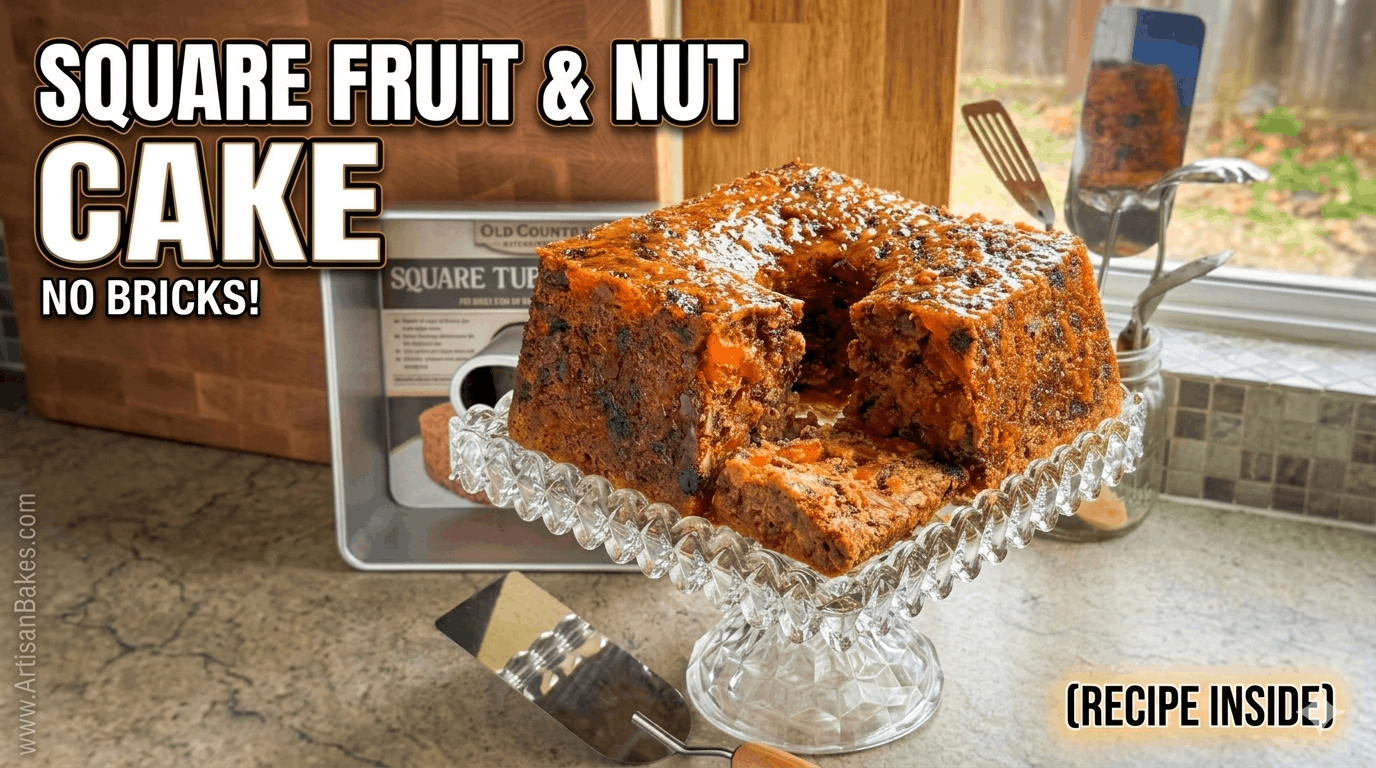
At Capri Restaurant, we celebrate the kind of cooking that feels like coming home — dishes made with patience, pride, and ingredients you can trust. Few recipes embody that spirit as fully as Brenda Gantt’s Orange Slice Cake: a dense, chewy, deeply Southern confection loaded with candy orange slices, sugared dates, crunchy pecans, and sweet coconut, all soaked in a thick orange sugar glaze that seeps down to the very core. It’s the cake your grandmother made for Thanksgiving and Christmas — the one that sat wrapped in wax paper on the kitchen counter and got better every day. We’re honored to share this beloved recipe, perfected in Brenda Gantt’s Andalusia, Alabama, kitchen, with our Capri community.
Brenda Gantt Orange Slice Cake Recipe
Ingredients
Equipment
Method
- Step 1 — Prepare the pan and preheat the ovenSet your oven to 250°F — and if you have an oven thermometer, now is the time to use it, because precision matters here. Grease your tube or bundt pan generously with butter or shortening, making sure to coat every crevice, then dust it lightly with flour and tap out the excess. Cut a circle of parchment paper to fit the bottom of the pan and press it in place — this extra step ensures the cake releases cleanly after its long bake. A cake this dense and full of sticky candy needs all the help it can get when it comes time to unmold.
- Step 2 — Flour the mix-insIn a large bowl, combine the chopped orange slice candies, chopped dates, shredded coconut, and pecans. Sprinkle a couple of tablespoons of your measured flour over the mixture and toss everything together with your hands until the candy and date pieces are lightly coated all over. This flouring step is one of the most important techniques in this recipe — it prevents the heavy, sticky mix-ins from sinking straight to the bottom of the batter during the long bake, and it helps them suspend evenly throughout the finished cake. Don't skip it, and don't be shy — every piece should have a light, visible coating.
- Step 3 — Cream the butter and sugarPlace the room-temperature butter in the bowl of your stand mixer fitted with the paddle attachment. Add the sugar and beat on medium speed for a full 3 minutes, until the mixture is noticeably pale, light, and fluffy. You should see the color shift from yellow to a creamy off-white and the texture become almost cloud-like — this process aerates the fat, which is what gives even a dense cake like this one its lift and tenderness. If your butter wasn't truly at room temperature, you'll struggle to get here; don't rush this step.
- Step 4 — Add the eggs one at a timeWith the mixer running on medium-low, add the eggs one at a time, allowing each egg to fully incorporate before adding the next — about 30–45 seconds per egg. The batter may look slightly curdled or broken between additions, and that's completely normal; it will come together as you continue. Room-temperature eggs blend more seamlessly into the fat than cold eggs do, which is why that 30-minute rest on the counter matters. By the time the fourth egg is incorporated, your batter should look smooth and slightly glossy.
- Step 5 — Prepare and add the buttermilk mixtureIn a small bowl, stir the baking soda into the buttermilk with a fork — it will foam up dramatically, nearly doubling in volume, and that reaction is exactly what you want. This is the leavening engine of the cake: the acidic buttermilk reacts with the baking soda to create carbon dioxide, which gives the dense batter its only source of lift and keeps the crumb tender rather than tough. Pour the foamy buttermilk mixture into the butter-egg batter and mix on low just until combined — the batter will look slightly curdled at this point, but trust the process.
- Step 6 — Combine the wet and dry ingredientsPour the wet batter over the flour-coated mix-in bowl, then add the remaining flour on top of everything. Switch to a sturdy wooden spoon and fold everything together by hand until just combined — you're looking for no dry flour pockets, but you're not trying to smooth the batter out completely. This is a thick, heavy batter, and it will resist stirring; use firm, deliberate strokes from the bottom of the bowl upward rather than vigorous beating. Overmixing at this stage develops gluten and can toughen the crumb, so stop as soon as the dry streaks disappear.
- Step 7 — Fill the pan and bakeScoop and spoon the thick batter into your prepared pan, pressing it gently with the back of a spoon to fill any air pockets and level the surface. The pan will be very full — this is expected for a cake this dense and loaded. Place it in the center rack of your preheated 250°F oven and do not open the door for the first 2 hours. The slow, low heat is the whole secret to this cake's moist interior — raising the temperature to speed things up will burn the exterior before the center is cooked through. Begin checking for doneness after 2½ hours by inserting a long skewer into the deepest part of the cake; it should come out clean, without wet batter clinging to it. The top should be deep golden brown with a lightly crusty surface.
- Step 8 — Make the glaze while the cake bakesAbout 20 minutes before you expect the cake to be done, combine the 2 cups of sugar and ¾ cup of orange juice in a medium saucepan over medium heat. Stir constantly as the mixture comes to a boil, then continue to cook for 1 full minute at a rolling boil until it thickens into a syrup — it should coat the back of a spoon lightly. Remove from heat and keep warm; you need to apply the first half of the glaze while both the cake and the syrup are still hot, so timing matters here. If your glaze cools and firms up before you're ready, reheat it gently over low heat.
- Step 9 — Poke and glaze in the panThe moment the cake comes out of the oven, use your long skewer to poke holes all over the top surface — aim for 20–30 holes spaced evenly across the cake, going deep. These holes are the channels that carry the glaze down into the interior of the cake, flavoring and moistening it from the inside out rather than just coating the surface. Pour exactly half the warm glaze slowly and evenly over the hot cake while it's still in the pan, letting it seep down into the holes. Leave the cake in the pan, cover loosely with a clean towel, and allow it to rest for a minimum of 2 hours — or overnight, which is even better.
- Step 10 — Unmold, glaze the outside, and rest againAfter the resting period, run a thin knife or offset spatula gently around the edges of the cake, then carefully invert it onto a wire rack or serving plate. Peel away the parchment paper from the bottom. Reheat the remaining glaze in the saucepan over low heat until it's warm and pourable again. Using your pastry brush, paint the warm glaze over all the exposed surfaces of the cake — the sides, the bottom (now the top), and any crevices — building up a thin, sticky, shiny seal all the way around. This outer glaze layer is what preserves the moisture of the cake for days and gives it that beautiful, lacquered appearance. Let the finished cake cool completely at room temperature before slicing — at least another 2 hours, or until the next morning.
Video
Notes
- The low-and-slow bake is non-negotiable: 250°F for 2½–3½ hours is the technique that defines this cake. At higher temperatures, the sugar-heavy candy and dates scorch before the center cooks through. Resist any urge to raise the heat — buy yourself a magazine, make a pot of coffee, and wait it out. The result is worth every hour.
- Flour your knife when chopping the candy: Orange slice candies and dates are intensely sticky. Dip your knife in a small bowl of all-purpose flour between every few cuts to keep the blade from gumming up and the pieces from welding back together. Working quickly also helps — candy softens from the warmth of your hands. Alternatively, freeze the candy slices for 15 minutes before cutting to firm them up.
- Room temperature matters for everything: Butter that isn’t truly soft will never cream properly, and cold eggs will cause the fat to seize and the batter to look broken in a way that doesn’t fully recover. Give yourself time — set the butter and eggs out a full hour before you plan to start mixing.
- How to know it’s done: The top of the cake should be deep golden brown and feel slightly firm, not soft, when you press it gently in the center. A long skewer should come out clean — some sticky residue from candy is expected and fine, but raw wet batter means it needs more time. Because of the candy and dates, doneness takes practice to read; when in doubt, give it another 20 minutes.
- Common mistake — skipping the overnight rest: Many first-time bakers slice into this cake after just a couple of hours and find it stickier and more fragile than expected. The overnight rest in the pan after the first glaze application is when the magic happens: the syrup penetrates deep into the crumb, the structure sets, and the flavors knit together. Brenda Gantt is emphatic about this — wrap it up, go to bed, and cut it in the morning.
- Flavor variations:
- Bourbon Orange Slice Cake: Replace ¼ cup of the orange juice in the glaze with good bourbon for a warm, smoky-sweet depth that pairs beautifully with the citrus candy.
- Chocolate Chip Orange Slice Cake: Fold in ½ cup of mini dark chocolate chips with the mix-ins for a bittersweet contrast to the candy’s sweetness.
- Walnut & Cranberry Version: Swap pecans for walnuts and add ½ cup dried cranberries to the mix-in bowl for a tangier, more tart holiday profile.
- Lemon Glaze Twist: Replace orange juice in the glaze with fresh lemon juice and add 1 tsp lemon zest — the sharper citrus cuts the sweetness beautifully for those who find the original very rich.
- Make-ahead instructions: This cake is at its absolute best made 1–3 days in advance. Bake, glaze, let rest overnight, then wrap tightly in plastic wrap and store at room temperature. The flavor deepens considerably by day two, as the glaze continues to penetrate and the mix-ins become more integrated into the crumb.
- Storage: Wrap the fully cooled, glazed cake tightly in plastic wrap, then a layer of aluminum foil. Store at room temperature for up to 5 days, refrigerated for up to 3 weeks. Do not store at room temperature in warm or humid climates — refrigerate instead.
- Reheating: This cake is best served at room temperature, not warm. If refrigerated, remove it from the fridge 30–45 minutes before serving and allow it to come to room temperature — cold temperatures firm up the butter and candy, making the crumb feel denser than it truly is. Individual slices can be very briefly microwaved (10 seconds maximum) if needed.
- Freezing instructions: This cake freezes exceptionally well. Wrap the whole glazed cake (or individual slices) tightly in two layers of plastic wrap, then aluminum foil. Freeze for up to 3 months. Thaw overnight in the refrigerator, then bring to room temperature before serving. The glaze seals the cake so effectively that freezing barely affects the texture or moisture.
- Dietary adaptations:
- Gluten-free: Substitute a 1:1 gluten-free all-purpose flour blend (such as Bob’s Red Mill or King Arthur Measure for Measure); results will be slightly denser but still delicious.
- Nut-free: Omit pecans entirely, or replace with toasted pumpkin seeds (pepitas) for crunch without tree nuts.
- Coconut-free: Simply omit the coconut — replace with an extra ½ cup of chopped pecans or dates to maintain the textural variety.
- Dairy-free: Use vegan butter (Earth Balance) and non-dairy buttermilk (1 cup oat milk + 1 tbsp apple cider vinegar, rested 5 minutes).
- Serving suggestions: Serve in thick slices with a strong pot of black coffee, hot tea, or sweet Southern-style iced tea. For a dessert platter presentation, arrange slices alongside a small dish of fresh whipped cream or a scoop of vanilla bean ice cream — the cool creaminess balances the richness beautifully. This cake also makes an extraordinary homemade gift: wrap a half-loaf in wax paper, tie with twine, and tuck a handwritten card with the recipe inside.
- Scaling and yield note: This recipe makes one large tube or bundt pan cake, yielding 16–20 slices depending on how generously you cut. It does not scale down easily due to the low-temperature baking method and the ratio of mix-ins to batter — smaller versions tend to dry out or not set properly. If you want to make multiple cakes (ideal for gifting), simply make the full recipe multiple times rather than attempting to double the batter in one mixing.
About the Recipe
The Brenda Gantt Orange Slice Cake is a traditional Southern fruitcake-style dessert that stars candy orange slices — those sugary, chewy orange-flavored jellied candies found in the candy aisle — as its central ingredient. Unlike conventional cakes, this one bakes low and slow at just 250°F for up to three and a half hours, allowing the candy pieces to melt gently into the batter, creating pockets of intensely sweet citrus flavor throughout. The result is a cake with a beautifully crusted exterior and a moist, almost sticky interior packed with texture: tender cake crumb, chewy dates, crunchy pecans, and soft shredded coconut.
Brenda Gantt — beloved Southern grandmother, Facebook cooking sensation, and author of multiple cookbooks, including “It’s Gonna Be Good, Y’all” — has made this cake famous through her warm, story-filled cooking videos. She bakes it every Thanksgiving and Christmas, and after watching her demonstration once, you’ll understand exactly why it earns a standing place on every holiday table. At Capri Restaurant, this is the cake we pull out when we want to make guests feel something — not just satisfied, but genuinely cared for.
The History of Orange Slice Cake
The Orange Slice Cake is a classic of the American South, with roots stretching back to the mid-20th century when candy orange slices became widely available as an affordable, shelf-stable ingredient. The cake belongs to a long tradition of Southern “keep cakes” — dense, sugar-heavy cakes loaded with dried fruit, nuts, and candy that could be made weeks in advance, wrapped tightly, and stored at room temperature for the entire holiday season without losing their quality. In fact, many bakers insist the cake tastes better on day three or four than it does fresh from the oven, as the glaze deepens and the flavors meld.
Handwritten versions of this recipe have circulated across church potluck notebooks, family recipe boxes, and Southern community cookbooks for generations. Brenda Gantt’s version — faithful to the old ways, down to the White Lily flour and the overnight glazing technique — brought the recipe to a new national audience through her enormously popular social media presence, where her cooking videos regularly reached tens of millions of viewers. She has described it as one of her most-requested holiday recipes, a dish that connects her viewers to their own mothers and grandmothers.
Where Is Orange Slice Cake Most Popular?
Orange Slice Cake is deeply rooted in the American South — particularly in Alabama, Georgia, Mississippi, Tennessee, and the Carolinas — where it appears on Thanksgiving and Christmas tables as reliably as pecan pie. It is especially beloved in small-town communities where church fundraiser cookbooks and hand-me-down recipe cards remain the gold standard of culinary authority.
Thanks to Brenda Gantt’s Facebook and YouTube platform, the recipe has spread far beyond its Southern origins, attracting devoted fans across the United States and internationally, including communities in Australia, Canada, and the UK who grew up with similar keep-cakes and recognized the style immediately. Searches for “Brenda Gantt orange slice cake” spike every October through December as home bakers begin their holiday baking season.
Why People Love This Cake — Key Benefits
- Holiday tradition in edible form: Few desserts carry as much nostalgic weight — this is the cake that reminds people of beloved family members and cherished celebrations.
- Make-ahead perfection: The cake genuinely improves over several days, making it ideal for busy holiday cooking schedules.
- Extraordinary shelf life: Properly wrapped, it stays fresh and moist at room temperature for up to a week, refrigerated for three weeks, and frozen for up to three months.
- Crowd-sized yield: One tube or bundt pan produces a generously large cake — easily 16–20 slices — making it ideal for gatherings and gifting.
- Unique texture experience: The combination of chewy candy, soft dates, crunchy pecans, and sweet coconut in every slice makes it unlike any other cake on the table.
- Simple pantry ingredients: Despite its complex flavor, every ingredient is affordable and widely available — no specialty imports needed.
Nutrition Overview (Per 1 Slice, based on 16 servings)
| Nutrient | Approx. Amount |
|---|---|
| Calories | ~420–480 kcal |
| Carbohydrates | ~68–75 g |
| Sugar | ~50–58 g |
| Protein | ~4–5 g |
| Total Fat | ~16–18 g |
| Saturated Fat | ~8–9 g |
| Fibre | ~2–3 g |
| Sodium | ~140–180 mg |
| Cholesterol | ~65–75 mg |
Values are approximate and vary based on brands used, glaze amount, and portion size. This is a rich, indulgent holiday dessert — enjoy it as a treat.
Who Should Be Mindful of This Cake?
- People managing diabetes or blood sugar: The cake contains very high amounts of sugar from candy, dates, glaze, and granulated sugar — consume in small portions.
- Those with tree nut allergies: Contains pecans — substitute with sunflower seeds or pumpkin seeds for a nut-free version.
- Gluten-sensitive individuals: The recipe uses all-purpose flour and is not gluten-free as written — see dietary adaptations in Notes for GF options.
- People monitoring saturated fat: One cup of butter plus eggs contributes significant saturated fat per slice.
- Young children: The chewy candy, orange slices, and dates can present a texture challenge for very young children — chop finely and supervise.
- Those with coconut allergies: Sweetened shredded coconut is a key ingredient — it can be omitted or substituted (see Notes).
Frequently Asked Questions (FAQs)
They are the soft, sugar-coated jelly candies shaped like orange wedges found in the candy aisle — not fresh oranges.
No — fresh orange pieces add moisture and bitterness that completely change the texture and balance of the cake.
250°F allows the dense, fruit-and-candy-packed batter to cook through evenly without the outside burning before the center sets.
A long skewer inserted in the center comes out clean (without wet batter) — some candy stickiness is normal and not a sign of underbaking.
Absolutely — it’s actually better made 1–3 days in advance; the glaze deepens, and the flavors intensify overnight.
Coating the candy and dates in flour prevents them from sinking to the bottom of the batter during the long bake.
You can, but the glaze is what keeps the cake moist for days and gives it its signature sticky, shiny exterior — don’t skip it.
Not for the first 3–5 days if wrapped tightly; refrigerate after that.
Yes — wrap tightly in plastic wrap and foil; it freezes beautifully for up to 3 months.
Any all-purpose flour works — White Lily is simply lower in protein and produces a slightly more tender crumb.
Yes — omit or replace with an equal amount of additional chopped pecans or dried cranberries.
The acid in buttermilk reacts with baking soda to create carbon dioxide — this is exactly what gives the dense cake its lift and tender texture.