Korean Milk Cream Donut Recipe
Ingredients
Equipment
Method
- Step 1 — Activate the yeast in warm milk. Measure the milk and warm it gently until it feels like comfortable bathwater — around 38–40°C. If it feels hot to the touch, let it cool for a minute before proceeding, as temperatures above 46°C will kill the yeast entirely. Pour the warm milk into your mixing bowl, add the instant yeast and sugar, and stir gently with a spoon. Let the mixture sit for 2 minutes — you should see small bubbles beginning to form at the surface. If using active dry yeast, wait the full 5 minutes until the surface looks visibly foamy before adding any flour. A yeast mixture that shows no activity after 5–7 minutes means the yeast is dead and the batch should not be continued — start fresh with new yeast rather than proceed and waste the rest of your ingredients.
- Step 2 — Form the initial dough. Add the bread flour and the room-temperature egg to the milk and yeast mixture. Using a wooden spoon or your mixer on its lowest speed, combine everything until no dry flour remains and a rough, shaggy dough forms. The dough will look sticky, almost uncomfortably so, and this is exactly correct — resist the urge to add extra flour. Adding flour at this stage will produce a tight, dense dough that will not develop the open, springy crumb that defines this style of donut. The stickiness resolves itself entirely during the kneading process.
- Step 3 — Knead in the butter and develop the gluten. Add the softened butter to the rough dough and begin kneading — by hand on a clean surface, or in the stand mixer with the dough hook on medium speed. This step takes 15 to 20 full minutes and cannot be shortened. At first the butter will seem to fight the dough, making it look greasy and even more impossibly sticky. After about 5 minutes, it will begin to smooth out. After 10 minutes, it will look silky and begin to pull away from the sides of the bowl. The dough is ready when it passes the windowpane test: pull a small piece between your fingers and stretch it gently — if it stretches thin enough to see light through without tearing, the gluten is fully developed. If it tears immediately, knead for another 5 minutes and test again. This gluten development is what gives the finished donut its cloud-soft, springy, almost pillowy texture.
- Step 4 — Proof the dough until doubled. Shape the dough into a smooth ball by pulling the sides underneath and rotating on the counter. Place it seam-side down in a lightly oiled bowl large enough to accommodate twice the volume. Cover the bowl tightly with plastic wrap — not a towel, which allows too much moisture to escape — and place it somewhere warm. An oven with just the light on (no heat) works perfectly. Let the dough proof for 2 full hours, or until it has genuinely doubled in size and looks visibly puffy and aerated. Do not rush this rise by increasing temperature — slow, steady proofing at around 27–30°C builds flavor in the dough. If your kitchen is cold, the rise may take up to 2.5 hours, and that is completely fine.
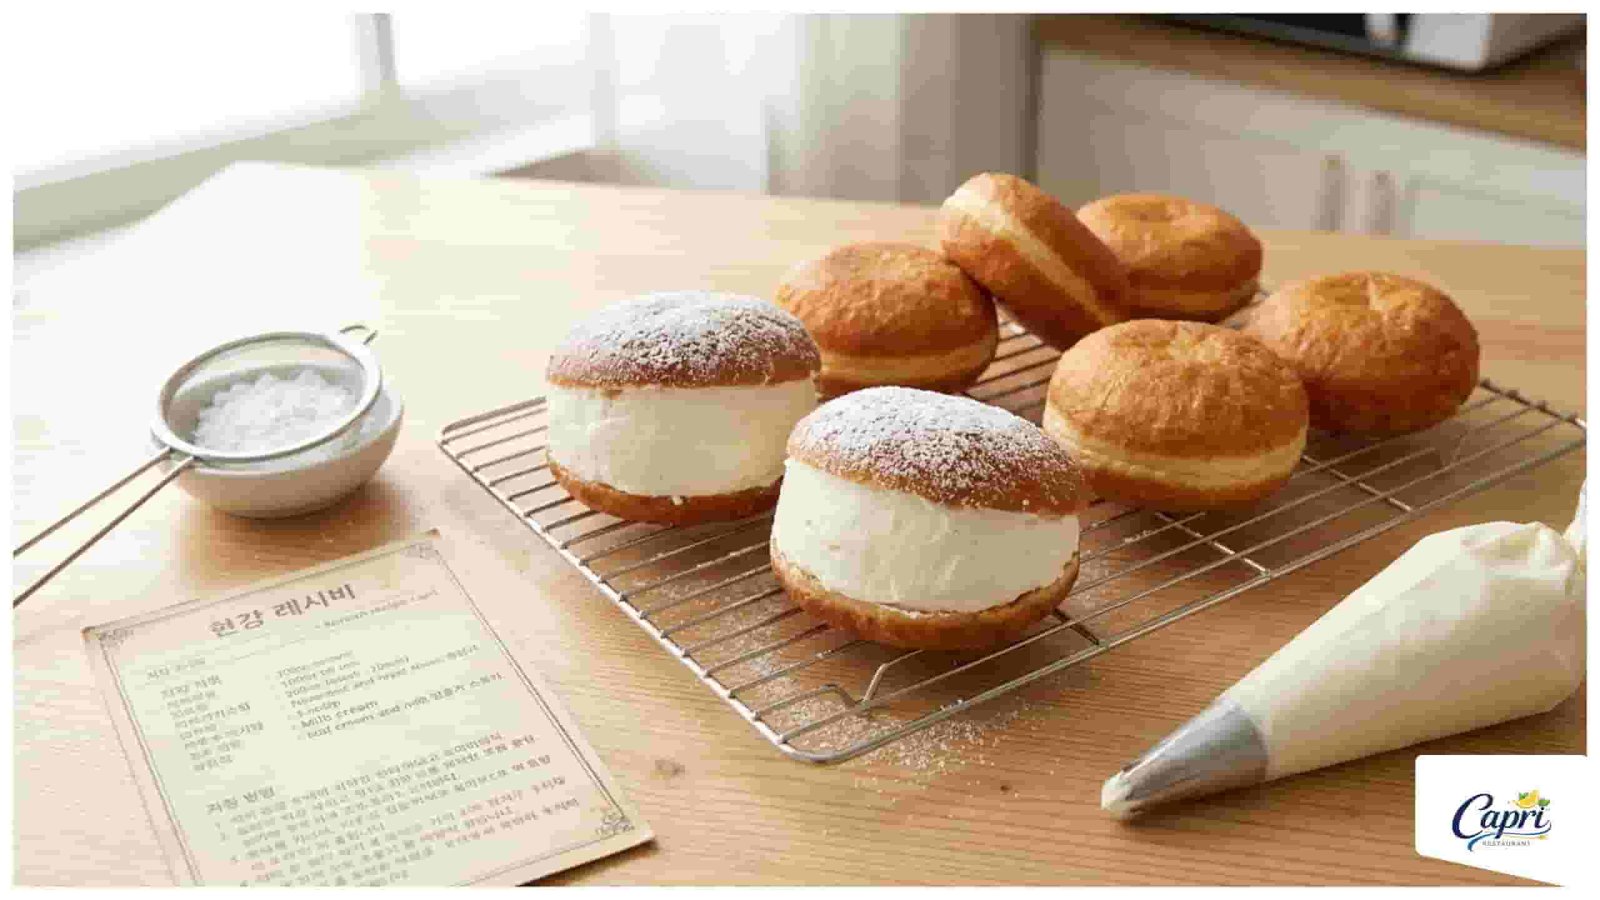
- Step 5 — Shape and cut the donuts. Gently deflate the risen dough by pressing down with your hands — do not punch aggressively, as you want to preserve some of the air structure. Turn it onto a clean, lightly floured surface and use your hands or a rolling pin to pat and press it into an even rectangle approximately 2cm thick. Using your round cutter, press straight down without twisting to cut each donut — twisting seals the cut edges and prevents the sides from rising freely. Place each cut round on its own square of parchment paper on a baking sheet. Gather the scraps, let them rest for 5 minutes to relax the gluten, then re-roll and cut the remaining pieces.
- Step 6 — Second proof. Loosely drape a clean kitchen towel over the tray of shaped donuts and leave them to proof again for 30 to 45 minutes at room temperature. They should look noticeably puffier and feel light and airy to the touch. The poke test confirms readiness: press a floured fingertip lightly into the side of a donut — it should leave a shallow indent that slowly and gently springs back over 3 to 5 seconds. If it springs back instantly, it needs more time. If the indent stays and doesn't spring back at all, it is slightly over-proofed but still fryable — proceed quickly.
- Step 7 — Fry to deep golden brown. Fill your deep pot with enough neutral oil to submerge the donuts — at least 3 inches of depth. Heat the oil over medium heat to exactly 170°C (340°F), measuring with your thermometer. This temperature is lower than most donut recipes because the enriched milk bread dough needs more time to cook through without burning the outside. Working in batches of 3 to 4 donuts at a time, lower each donut into the oil by holding the parchment square and gently submerging it — the parchment will release from the dough within seconds, at which point you can remove it with tongs. Fry for approximately 2 minutes per side, turning once, until both sides are a rich, even golden brown. Transfer to a wire rack and monitor your oil temperature between batches — it drops when cold dough goes in and climbs when donuts come out, so adjust the heat accordingly.
- Step 8 — Whip the milk cream to stiff peaks. While the donuts cool on the rack, prepare the cream filling. Pour the cold heavy whipping cream into a clean, chilled mixing bowl (30 minutes in the freezer beforehand makes a real difference in how quickly and stably it whips). Add the sifted powdered sugar. Start your electric mixer on its lowest speed to prevent the cream from spraying, then gradually increase to high speed. Whip until the cream holds firm, upright peaks that do not slump or droop when the beaters are lifted — this is stiff peaks stage. Stop immediately when you reach this point. Over-whipped cream turns grainy and yellow and cannot be salvaged. Transfer the whipped cream to your piping bag fitted with a large round tip and refrigerate until ready to use.
- Step 9 — Fill, finish, and serve. Wait until the donuts are fully cooled to room temperature before filling — even residual warmth will cause the cream to melt and leak. Using a sharp serrated knife, slice each donut horizontally, cutting about two-thirds of the way through and opening it like a book, or slicing cleanly in half. Use a pastry brush or a spoon to generously coat the inside cut surfaces of each donut with sweetened condensed milk. Take the piping bag from the refrigerator and pipe a generous, tall swirl of cream onto the bottom half of each donut — more than you think is necessary is exactly right. The authentic Korean bakery version is famously abundant with cream. Place the top half back on, dust the finished donuts with a generous snowfall of powdered sugar, add fresh berries if using, and serve immediately. These are best in the first 30 minutes after filling.
Video
Notes
- The 15–20 minute knead is the whole ballgame: Every quality issue specific to this style of donut — dense crumb, poor rise, torn texture, flat sides — traces to under-developed gluten. The windowpane test is your only reliable guide. Do not rely on time alone; knead until the dough genuinely stretches thin and translucent without tearing, regardless of how long that takes.
- Use bread flour, not all-purpose: The 1–2% higher protein content in bread flour creates a meaningfully different gluten structure — one that is more extensible, more elastic, and more capable of trapping the gas produced during proofing. All-purpose flour works in an emergency but produces a noticeably softer, less structured crumb that tears more easily and doesn’t achieve the same cloud-like bounce.
- Oil temperature is your frying compass: 170°C (340°F) is the sweet spot specifically for enriched milk bread dough. Higher heat (180°C+) will brown the outside before the inside is cooked through. Lower heat produces pale, greasy donuts that absorb more oil than they should. Check and adjust between every batch — the oil rises in temperature when donuts are removed and drops when new cold dough goes in.
- How to know when they’re done: A properly fried donut will be a deep, even golden brown on both sides, feel light when lifted (not heavy with absorbed oil), and register approximately 88–90°C (190°F) on an instant-read thermometer inserted into the center. The sides should have a slightly paler band around the equator — this is the surface that sat at the oil line and is completely normal.
- Cool completely before filling — no shortcuts: Even 10 degrees of residual warmth in the donut crumb will begin to melt the whipped cream from the inside out. The cream will liquify, pool, and make the inside of the donut soggy within minutes. A fully cooled donut holds the cream firmly for up to an hour at room temperature.
- Variation — Chocolate milk cream: Add 2 tablespoons of sifted Dutch-process cocoa powder to the cream before whipping, and brush the inside of the donut with Nutella instead of condensed milk. The filling becomes a chocolate-forward, truffle-adjacent experience.
- Variation — Matcha cream: Add 1½ teaspoons of high-quality culinary matcha powder to the powdered sugar before whipping into the cream. Brush the inside of the donut with a thin layer of sweetened red bean paste (anko) before filling. The bittersweet matcha and the earthy sweetness of red bean is a combination deeply rooted in East Asian bakery tradition.
- Variation — Strawberry cream: After whipping the cream to stiff peaks, gently fold in 3 tablespoons of freeze-dried strawberry powder for color, flavor, and a concentrated fruitiness that fresh berries alone cannot achieve. Finish with a fresh strawberry slice on top of each filled donut.
- Variation — Baked (not fried): Place the second-proofed donuts on a parchment-lined baking sheet and bake at 180°C (355°F) for 12–14 minutes until light golden. The exterior will be softer and paler than the fried version, and the crumb will be slightly more bread-like, but the filling and overall flavor remain very good. This is a meaningful calorie reduction and a practical option if you prefer to avoid frying.
- Make-ahead instructions: The dough can be made through the shaping step, placed on parchment squares on a covered baking sheet, and refrigerated overnight (up to 16 hours). The next day, bring the shaped donuts to room temperature for 45–60 minutes — they will complete their second proof during this time — then fry as directed. The overnight cold proof actually develops more complex flavor in the dough.
- Storage: Unfilled donuts keep in an airtight container at room temperature for 1 day, or refrigerated for up to 2 days. Reheat unfilled donuts in an air fryer or toaster oven at 150°C (300°F) for 3–4 minutes before filling — this refreshes the exterior without drying the crumb. Filled donuts must be refrigerated and are best consumed the same day they are assembled. The cream softens the crumb over time and the donut becomes soggy by day two.
- Freezing: Unfilled, fully cooled donuts freeze well for up to 1 month — wrap each individually in plastic wrap before placing in a freezer bag. Thaw at room temperature for 1 hour, warm briefly in the oven, then fill and serve. Do not freeze cream-filled donuts, as the cream collapses and weeps on thawing.
- Scaling note: This recipe makes 8 donuts, which is ideal for a family or small gathering. For a party of 12–16, double the dough recipe and work in two batches during the fry stage to maintain oil temperature control. The cream filling quantity can be scaled proportionally — 80g of cream per donut is a generous working ratio.
What is a Korean Milk Cream Donut?
The Dish at a Glance
Korean Milk Cream Donuts — known in Korean bakeries as 크림도넛 (cream donut) or 우유크림도넛 (milk cream donut) — are a style of filled donut built on a milk bread dough that is fundamentally different from Western donut dough in both composition and technique. Where American donuts are typically made from a simpler, less enriched dough fried at higher temperatures for a crispier shell, Korean milk cream donuts use a heavily kneaded, butter-enriched, high-gluten bread dough that proofs slowly, fries at a lower temperature, and produces a result with the softness and bounce of a dinner roll rather than the crisp exterior of a glazed ring donut. The difference is immediately apparent in the hand: these donuts feel light, almost hollow, and spring back gently when pressed.
The filling is not pastry cream or custard — it is cold heavy cream whipped to stiff peaks with powdered sugar, sometimes enriched with condensed milk. It is deliberately lighter than the European-style filled donut tradition, reflecting a broader aesthetic in Korean bakery culture that prioritizes delicacy, clean dairy flavor, and restraint over richness. The condensed milk brushed inside the sliced donut adds a caramel-adjacent sweetness that rounds the filling without making it heavy.
The Origin and Viral Moment
Milk bread — the soft, slightly sweet enriched bread that is the backbone of this donut dough — has deep roots in East Asian baking, traceable to the Japanese shokupan (milk bread loaf) and the Hokkaido milk bread tradition that spread throughout Japan, Korea, and Taiwan in the mid-20th century. The donut application is a more recent Korean innovation, with bakeries in Seoul’s café-dense Hongdae, Mapo, and Seongsu neighborhoods popularizing the cream-filled version in the late 2010s and early 2020s.
The global viral moment came between 2020 and 2023, driven by TikTok and Instagram Reels. Videos of Korean bakery staff cutting open cream donuts — revealing a billowing, almost impossible volume of fresh cream — were watched hundreds of millions of times. The combination of the photogenic golden exterior, the dramatic cream reveal, and the universally familiar donut format made this one of the most-replicated K-food trends in home baking history. Home bakers in the US, UK, Australia, and across Southeast Asia began recreating the recipe, and it quickly became a benchmark recipe for anyone interested in Asian pastry technique.
What Makes the Dough Different
The secret to the texture is the combination of bread flour (for high-gluten structure), an extended knead (to fully develop that gluten), and the delayed butter addition method — a technique borrowed from enriched bread-making where fat is incorporated after the gluten network is established, rather than from the start. Adding butter at the beginning would coat the flour proteins and prevent gluten formation, producing a short, crumbly texture. Adding it partway through allows the gluten to develop first, then the butter integrates slowly into that network, making the dough extraordinarily tender without making it weak.
BENEFITS
1. It Teaches Three Foundational Baking Techniques in One Recipe
Making these donuts from scratch requires competency in enriched yeast dough handling, proper gluten development assessment (the windowpane test), and cream whipping technique. All three of these skills are directly transferable to dozens of other recipes — brioche, cinnamon rolls, Japanese milk bread loaves, Swiss rolls, pavlovas, and any other application involving whipped cream or laminated dough. This is one of the most technically educational dessert recipes a home baker can take on.
2. The Dough Itself Is Genuinely Nutritious by Fried Donut Standards
Because this dough is enriched with whole milk, egg, and butter rather than shortening or liquid fats, it provides protein, calcium, and fat-soluble vitamins from real dairy ingredients. The bread flour contributes a small amount of protein. Compared to mass-produced grocery store donuts — which are typically made with partially hydrogenated fats, high-fructose corn syrup, and artificial flavors — this is a meaningfully cleaner, more ingredient-transparent version of the same pleasure.
3. You Control the Fat and Sugar Content
Commercial cream-filled donuts contain significantly more sugar and trans fats than this recipe because commercial production prioritizes shelf life and cost. In this recipe, the cream filling contains only heavy cream, powdered sugar, and condensed milk — no stabilizers, no artificial sweeteners, no preservatives. The amount of condensed milk brushed inside is entirely to your taste, and the powdered sugar in the cream can be reduced by 20–30% for a less sweet result that still holds its structure perfectly.
4. It Is Adaptable for Different Dietary Approaches
The donut dough can be made dairy-free using oat milk or almond milk in place of whole milk, and coconut oil in place of butter — the texture will be slightly different but still very good. The cream filling can be replaced with a coconut cream whipped to stiff peaks (use full-fat coconut cream, chilled overnight) for a fully dairy-free version with a subtle tropical note. The baked variation (see Notes) reduces oil absorption significantly for those avoiding fried foods.
5. It Delivers an Extraordinary Experience at a Fraction of Café Cost
In Seoul cafés and in Korean bakeries operating in major Western cities, a single Korean milk cream donut sells for between $5 and $9 USD. A full batch of 8 donuts using this recipe costs approximately $8–$14 in ingredients — roughly $1–$2 per donut. Making them at home puts a premium café experience on your table for a fraction of the price, and with the added satisfaction of having made something genuinely difficult well.
6. The Presentation Is Spectacular
Few home-baked items have the same visual impact as a Korean milk cream donut assembled correctly — the golden, sugar-dusted exterior, the generous cloud of cream visible from the side, the optional fresh berry on top. They photograph beautifully, they look festive and celebratory on any table, and they create an immediate reaction when served. For anyone hosting a brunch, a birthday breakfast, or a special occasion gathering, the impression they make is disproportionate to the effort once you have made the recipe a couple of times.
BEST COMBINATIONS
Drink Pairings
The filling’s clean, lightly sweet dairy flavor makes this donut one of the most beverage-friendly pastries in the Korean bakery canon. The right drink balances rather than competes.
- Iced Americano: The definitive Korean café pairing. A long, cold, slightly bitter black coffee consumed alongside a cream donut is a cultural institution in Seoul — the bitterness cuts through the fat and sweetness with every sip, resetting the palate for the next bite. This pairing has been standard in Korean café culture for years and works just as well at home.
- Hot café latte or flat white: For a warm version of the same logic — milky, mellow coffee with a gentle bitterness. The milk in the coffee echoes the milk in the donut filling without amplifying the sweetness.
- Cold milk: The most innocent and the most honest pairing. Full-fat cold milk alongside a cream donut tastes like the purest expression of dairy sweetness, and there is nothing wrong with that.
- Barley tea (boricha): The nutty, slightly toasty, caffeine-free character of Korean barley tea played against the sweet cream is a pairing that is deeply traditional in a Korean home context — understated, clean, and genuinely complementary.
- Matcha latte: The bitter, vegetal intensity of matcha is a natural foil for sweet cream. An iced or warm matcha latte alongside a plain cream donut or the matcha cream variation is one of the most photographed café pairings in Korean food media.
- Dalgona coffee: The whipped instant coffee poured over cold milk that went viral around the same period as these donuts. Serving them together is very much on-trend and creates a fully Korean café-at-home experience.
Flavor Pairings on the Plate
- Fresh strawberries: The most popular fruit accompaniment in Korean bakeries — the tartness and freshness of ripe strawberries against the sweet cream is a classic match that appears constantly in Korean dessert culture. Arrange halved berries around the filled donuts or on top of each one.
- Fresh mango slices: In summer, sliced ripe mango alongside or inside the cream donut (replacing the condensed milk brush with a thin layer of mango purée) is an exceptional seasonal variation.
- Vanilla ice cream: Serving a still-warm, just-fried, unfilled donut alongside a scoop of good vanilla bean ice cream — letting the ice cream melt slightly into the donut — is a decadent but completely defensible dessert plate.
- Red bean paste (anko): A Korean and Japanese pantry staple, thinly spread on the cut inside of the donut before the cream goes in. The earthy, mildly sweet red bean provides a complexity that makes the donut feel more distinctly East Asian in character.
Occasion Pairings
- Birthday breakfast: Replace a birthday cake with a plate of 8 Korean milk cream donuts, dusted with sugar and adorned with candles and fresh berries. The impact is spectacular, and the individual serving format means no slicing, no mess.
- Weekend brunch: Arrange filled donuts on a board alongside seasonal fruit, coffee, and perhaps a savory egg dish. The sweet donuts as part of a larger spread rather than a standalone treat allows guests to calibrate their own sweetness intake.
- After-school snack: Unfilled donuts can be made ahead, refrigerated, and filled quickly when needed. The combination of enriched bread dough (satiating), cream (calorie-dense), and sweet dusting sugar (immediate energy) makes them an effective and beloved after-school treat.
- Dessert table at parties: Mini versions (cut with a 5–6cm cutter) filled and dusted make elegant two-bite party pastries that are far more interesting than store-bought cookies and far more manageable than a full dessert cake.
- Valentine’s Day or anniversary breakfast: A plate of cream donuts with strawberries, two cups of coffee, and nothing else is an effortlessly romantic morning gesture that requires real skill but communicates warmth and care in a way a bought gift cannot.
FAQs
There are four common causes. First, the milk was too hot and killed the yeast — anything above 46°C destroys yeast activity; always test the milk temperature on your wrist before adding the yeast. Second, the yeast itself was old or dead — test a new batch in warm water with a pinch of sugar; if it doesn’t foam within 5–7 minutes, discard it. Third, the proofing environment was too cold — the dough needs a consistent 27–30°C to rise at a normal rate; an oven with only the light on is ideal. Fourth, too much flour was added during kneading, tightening the dough and inhibiting the yeast. If the dough rises slowly but consistently, simply give it more time — a slow proof at cooler temperatures still works, just takes longer.
No. This dough is intentionally sticky, especially before and during the butter incorporation phase. Adding flour to reduce the stickiness at this stage is the most common mistake home bakers make, and it results in a dense, tough final product. Trust the process: knead for the full 15–20 minutes and the stickiness will resolve itself as the gluten develops and the butter fully integrates. If the dough is still coating your hands completely after 15 minutes of kneading, a very light dusting of flour on the work surface (no more than 1 tablespoon total) is acceptable — but only as a last resort.
Pull a small piece of dough from the mass — about the size of a large marble. Hold it between the thumbs and forefingers of both hands and gently stretch it outward, rotating as you stretch, as though you are stretching a tiny pizza. Properly developed gluten will allow the dough to stretch into a thin, translucent membrane without tearing — you should be able to see the shadow of your fingers through it. If the dough tears before reaching this stage, continue kneading for another 3–5 minutes and test again.
The oil was too cool. At temperatures below 160°C, the dough absorbs oil rapidly before the exterior has a chance to form a proper crust. Always verify the temperature with a thermometer before adding the first batch, and monitor it continuously throughout frying. If you don’t have a thermometer, drop a small piece of leftover dough into the oil — at the correct temperature, it should sink briefly, then rise to the surface and begin sizzling actively within 10–15 seconds.
Yes, with a caveat. Whipped cream softens and begins to deflate after 4–6 hours in the refrigerator as the air bubbles gradually escape and the cream settles. If making ahead, whip it slightly past soft peaks and slightly before stiff peaks — this gives it room to deflate a little overnight and still be at the correct consistency by morning. Give it a 10–15 second re-beat with the mixer before piping. Do not make the cream more than 12 hours ahead of serving.
The donut was still warm when filled. Even a donut that feels cool on the outside may retain heat in the interior crumb for 20–30 minutes after frying. Always wait a full 30–45 minutes after frying before filling, and if you are working in a warm kitchen, refrigerate the fried donuts for 10 minutes before slicing and filling. Melted cream also results from cream that was under-whipped — it must reach genuinely stiff peaks (peaks that stand upright without drooping) to maintain its structure inside the donut.
Yes, but the result will be different in a way that is noticeable. All-purpose flour has less protein (around 10–11% versus 12–14% for bread flour), which means less gluten development and a softer, more tender, less elastic crumb. The donut will still taste good, but will have less of the characteristic bounce and spring of the authentic Korean bakery version. If bread flour is unavailable, add 1 tablespoon of vital wheat gluten per cup of all-purpose flour as a supplement — this raises the protein content closer to bread flour levels.
Use a 5–6cm round cutter instead of the 9–10cm called for in the recipe. Cut and proof exactly as directed. Fry for 1–1.5 minutes per side rather than 2, watching carefully as they color quickly at this size. Fill with a smaller piping tip (a Wilton 1A or 2A works well for minis) and use less cream per donut. One batch of this recipe produces approximately 14–16 mini donuts rather than 8 full-size ones.
Yes — see the baked variation in the Notes section. Bake the second-proofed donuts at 180°C (355°F) for 12–14 minutes. The key differences: the exterior will be softer and paler, lacking the slightly crisp, golden-brown shell of the fried version. The interior crumb will be slightly more bread-like and less airy. To compensate, brush the baked donuts with melted butter immediately as they come out of the oven, which adds richness and a light sheen. The filling process is identical. Baked donuts absorb the cream more readily, so fill them right before serving rather than ahead of time.
Refrigerate in a single layer in an airtight container. The cream filling will keep safely for up to 2 days, but the donut itself will soften and become slightly soggy as the cream’s moisture migrates into the crumb over time. For the best possible experience, fill only what you plan to eat in the next 2 hours and store the remaining donuts unfilled, filling them as needed. Unfilled donuts reheat beautifully in an air fryer at 150°C for 3 minutes.